Tuesday, August 28, 2012

Design Team Reveal!

Alright its time for my second design team reveal over at Two Scrapbook Friends. This time around I got "Everyday Eclectic" from Echo Park!  I absolutely love Echo Park! They are one of my favourite manufactures in the scrapbook world.  There papers are so easy to work with and are very much my style. I love how much the colours stood out when I saw this line online and couldn't wait to work with it once I received it as my kit.


I loved all the patterns on the paper because of how vibrant the colours were but was kind of nervous to see what pictures I was going to be able to use with the line.


I found that craft paper worked really well while creating with this paper. Below was one of my favourite patterns in the line! I just love the clouds!


I also loved the honey comb paper. As soon as I saw this patterned paper in the collection I knew I had to do something and cut the pattern out.


Echo Park is probably one of my favourites because of the sticker sheets that they come out with! They are always so full of things and for a very good price. I have an obsession with alphabet stickers when I am scrapbooking. I have alphabet stickers in probably every single colour so when I saw these I fell in love.


This was the first layout that I created. One of the new styles I have noticed in scrapbooking these days is the honey comb pattern.  Every manufacture has some paper in the lines that they create that has this look to it. This paper caught my eye as soon as I saw it!


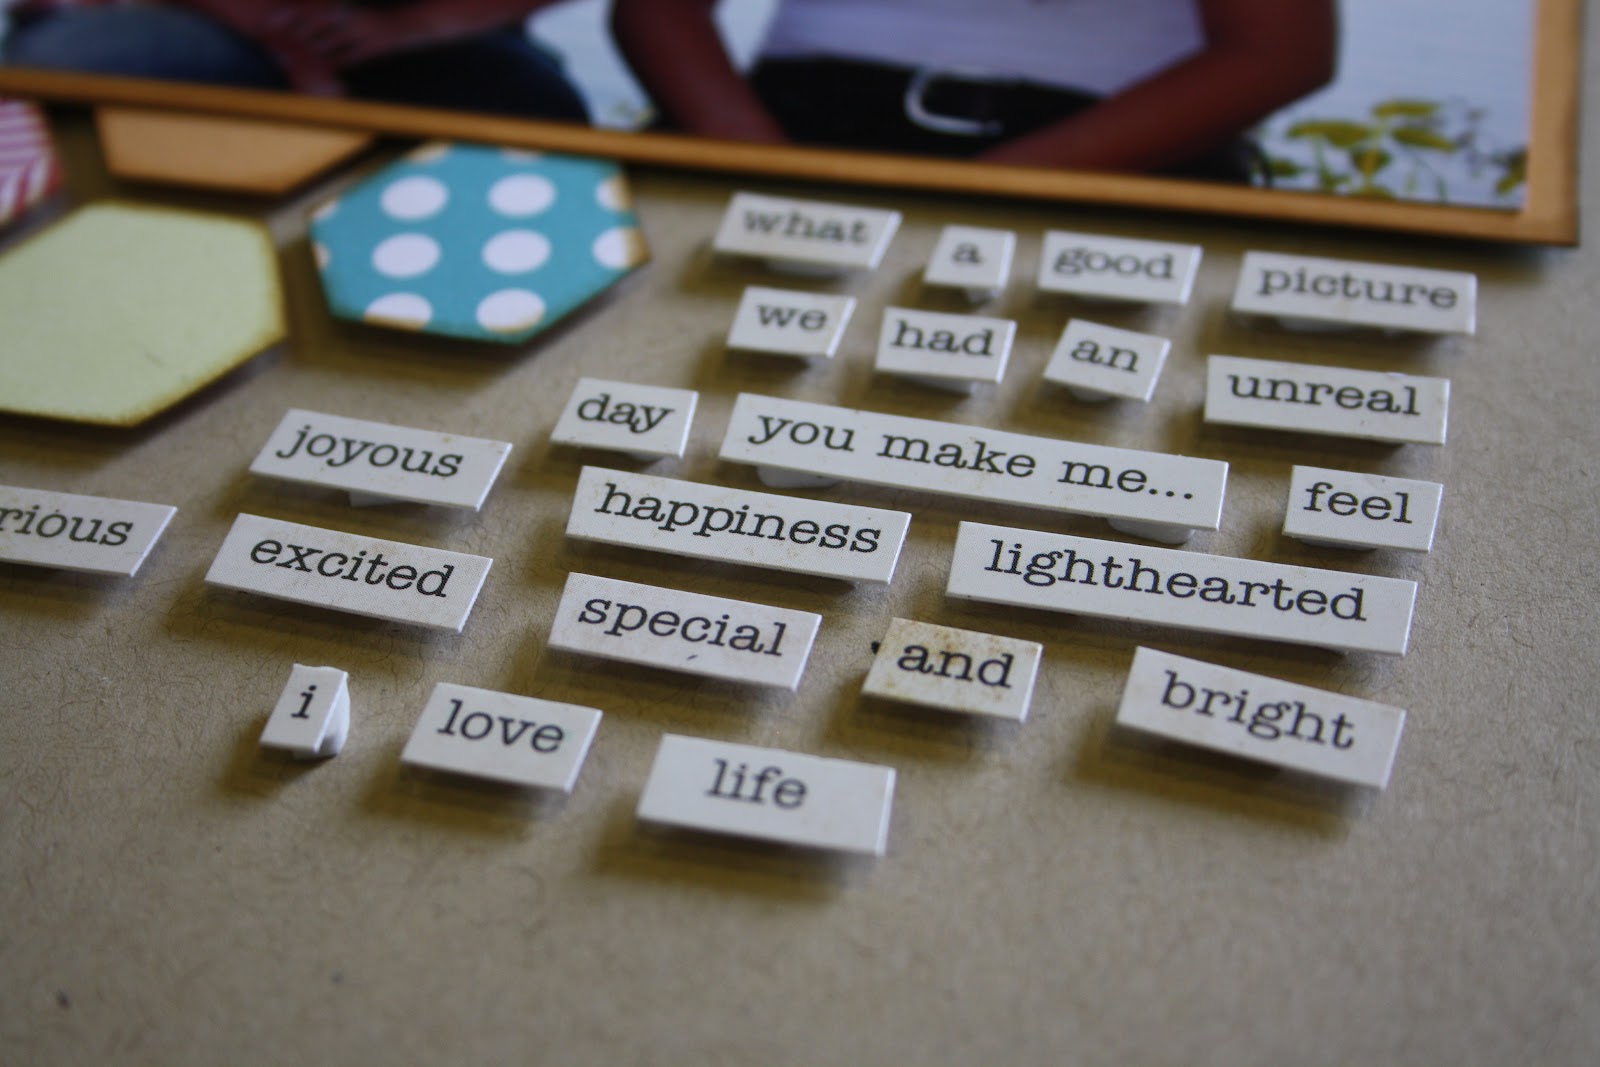
While creating this layout I kept it very clean and simple! To add a little bit more detail I used the journaling words from Authentique to do my journaling. I have done this on a couple layouts and it takes forever to try to come up with your journaling but it looks amazing when your finished. I popped up my journaling because I thought it would stand out a little bit more.


When finishing up this layout I used more pop dots (one of my favourite scrapbooking things) and popped up my background pieces that I cut out of my pattern paper to give my layout more of a 3D effect so it didn't look so flat to that page.


My next layouts was one of my favourites.  I went with the clean and simple look again and I think it turned out great! I got some professional photos done from a friend that I went to school with and the pictures were perfect with this line! Most of them were in black and white so the colours really popped when I used them.


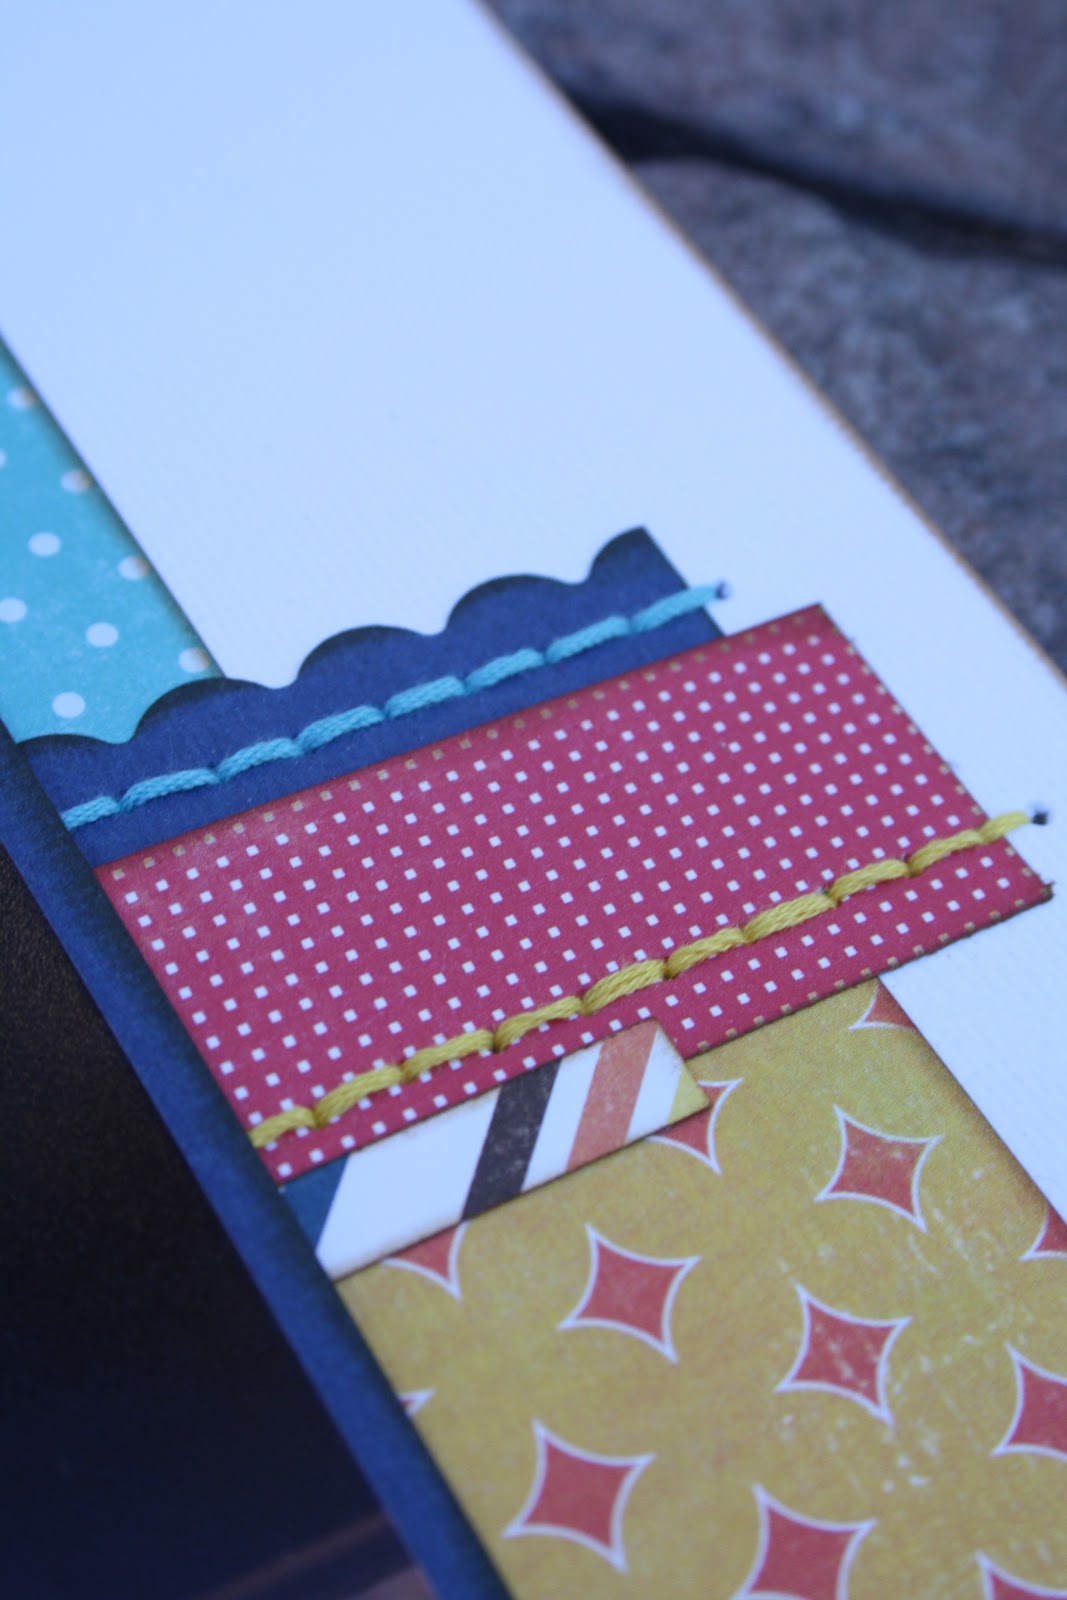
I have been stitching on almost every layout I have been creating the past little while so why not do it on this one? I cut out a couple hearts and popped them up with pop dots and stitched down the center with a contrasting colour.


The final touch to this layout were my butterflies. I love the look of butterflies on the layouts I have seen in magazines and I hadn't tried them until this layout. After seeing the way that they look I think all my layouts are going to have butterflies on them. I added little spools on the top of them and wrapped then with contrasting floss to add a little bit of colour and taaadaaaa!


My next layout was also really neat! I tried a bunch of new things while working with this paper so I really liked them all. This one had a couple of new things I have never done before and it turned out really well.


I used the Silhouette to cut out my title for my layout and it turned out really well.


I stitched a "rainbow" pattern on my layout to add a little more colour and a different effect. To finish off the "rainbow pattern"  I added matching brads around the outside. Then I cut out a couple clouds and popped them up to finish off my layout.


The last layout that I created was by far my favourite! I wont say much about this one because it will have its own blog post shortly.


The final project I made with my design team kit was this adorable card! I stitched again to create the circles on the background.  Then I cut out some butterflies and added a couple matching gems to finished the card off.


This new Echo Park line is in the store so stop by and check it out!  Thanks for stopping by!

Monday, August 20, 2012

Crafty Challenge at Two Scrapbook Friends

Its time for another Crafty Challenge over at Two Scrapbook Friends. I just recently tried something new myself and thought it would be something perfect for a Crafty Challenge. Alot of manufactures are coming out with these element pages like below and I usually cut them apart and use them as journaling cards or I use little pieces of them on a layout but I usually end up wasting a bunch of the sheet because I don't know how to use them. What made this piece of paper was kind of tricky because it was double sided so I had to pick what pattern I preferred more.


The layout below was created with only using that one piece of pattern paper and a couple stickers from the line as well. The crafty challenge for this week is to use a piece of paper that has been divided into the 3x4 cards like above and try to create a layout just using that one piece of paper and a other elements as necessary. It was very challenging at first but I loved the way it turned out!


To finish off the last couple parts of my layout I added a couple of the stickers from my sticker sheet I had that went along with the theme of my layout.


My favourite element of the entire page was the planes I cut out and stitched a trail behind  them! It turned out so well!


I hope you guys have fun creating with this challenge and I certainly hope to see your creations.  Don't forget to upload your project to the Two Scrapbook Friends Forum or Layout Gallery.

Wednesday, August 8, 2012

Sketchy Challenge

It's time for another Sketchy Challenge over at Two Scrapbook Friends! This weeks sketch is one of my favourites because It was so easy to work with. I loved all the layering of the papers and all of the little embellishments that you could add.

Below is the sketch that I drew.


This is the layout that I created based on that sketch!


I loved the line that I used! The colours all went to well with the photos that I picked for the layout which always makes it easier. I used a variety of different letters to create my title to create a different look.


I cut out some of the sayings in one of the patterned papers to use for part of my "journaling"


I stitched as always on my page to create a different texture and to make the colours pop a little bit more on the page.


Finally, I cut out some of the cut little fish from one of the pattern papers as well and added some dew drops as the bubbles.


Creating with sketches is an awesome way to broaden your style in scrapbooking. It gives you a plan slate to start and work up from there. I would love to see all of your projects you do with my sketch. Just upload them to the Two Scrapbook Friends Forum or Layout Gallery!

Thursday, August 2, 2012

Olympic Games Challenge

Over at Two Scrapbook Friends we are having our own 2012 Olympic Challenge!  I am not really someone who pays any attention to the Olympic's but the summer ones are definitely more the sports I would enjoy watching. Since in the Olympics the logo is the rings my challenge for all you scrapbookers is to use circles on your page. The circles can be any colour you just have to use them. You can use pattern paper with circles, die cut circle, stamp circles, the list could go on and on.


This is the layout I created with the challenge. I LOVE circles. I find when I am picking out pattern paper I am always drawn towards paper with dots on it.


I used American Crafts Thickers for my title.


I stitched down the side of my cardstock to add a little bit more colour to my layout. I also pop dotted a couple of my pictures so that they would stand out as well.


Now onto my circles.  I used pattern paper that included circles but that wasn't enough for me. I stitched a bunch of circles down the side of my page kind of like a border. I was defiantly a lot of stitching but in the end it was worth it!


I hope to see everyone join in all the fun over at Two Scrapbook Friends! Be sure to post your project on the  Forum or the Layout Gallery.

Wednesday, August 1, 2012

Someone Special!

Hello everyone! I have been away at the cottage for the past couple days and haven't had a chance to post anything on my blog! We got a WiFi connection so I thought I should do a little blog post! Being away at the cottage I miss alot of things that are in my daily life! I miss my cats, my job believe it or not, my bed, and my best friend! Carly wasn't able to come up to the cottage for the entire week this year because her nephew was being born the day that we were leaving for the cottage.


I don't blame her for staying home to be home to welcome him into the big world. I will be doing a post about baby Jaxon shortly to show everyone the new addition to my life.  Anyways! Carly is going to be coming up to the cottage tomorrow morning early and I will get to spend the rest of the week with her! Carly is my partner in crime! We do everything together!  People wonder how we don't get sick of each other but I honestly don't know what I would do without Carly.


Carly and I have been through alot together!  She has been going through a rough patch the last little while and I am kind of her support system because I understand what she is going through! Sometimes I get frustrated with her because things just don't click in her head and then she gets upset but she is slowly starting to learn.


I worry about her alot because she always puts so much on her plate at one time and then tries to take on the world. Shes a strong girl but man she takes on alot! I am really excited to spend the last couple of days at the cottage with her. I have spent the first half of the week with my brothers and their friends and its getting to be a little too much!


Carly, I can't wait to see you tomorrow! Hope the drive goes smoothly and you make it here in good time! Remember keep your head high! You can make it through anything you put your mind too!


Friday, July 27, 2012

Friendzy Friday with Amanda!

Alright well its time for another Friendzy Friday over at Two Scrapbook Friends. I will be giving you a quick tutorial on how to create your own pillow box without using any die cutting machine or template.

I stumbled across this tutorial on Pinterest and it really caught my eye because it was really simple to do, didn't take much time, and you can adjust it to whatever you are using them for.


Here are all of the supplies that you need to create these really cute pillow boxes. You need a 12x12 piece of paper. I chose to use pattern patter so I could decorate it after with other papers from the line. You will also need adhesive of some kind, a butter knife or bone folder, scissors, a bowl or CD and your 12x12 trimmer.


To make the pillow box that I made you need to cut a 8x10 piece of paper so that when you are finished it will be approx 4 inches tall and about 8 inches long.


Then you are going to score a half inch fold on the longer side of your paper to create a flap to glue your box together.


Next, you need to fold the folder in half up until the edge is covering the flap you just created.


Using your bowl or CD round off both short ends of your folded paper. Then cut on the pencil lines to take away the scrap paper.


Then you will have something that looks like this.


Open up your folded paper. Using the butter knife or bone folder and the bowl or CD as a guide, score the outer flaps. Make sure you only score it. Make sure you aren't pressing to hard otherwise you will cut through the paper. The arcs will create almond-shaped indentations.


After scoring the paper you should have indentations that look like this.


and towards the sides should look like this.


After you have your score lines created you need to fold on your lines to create the flaps that will close your pillow box.


Once you have folded on all four score lines apply adhesive to your 1/2 inch flap and glue your pillow box together. Once your adhesive has set fold in your flaps on the ends of your pillow box.


Afterwards you can decorate your pillow box for any theme. I used mine as a party invitation idea.


I added a 1 inch stripe along the box and attached a popsicle for the summer themed party and popped it up to add a little more dimension.


I used some stickers that I had in my stash to decorate the front with Happy Birthday.


Finally inside the pillow box I created was a matching invitation for the birthday party.


If you need any further directions you can visit the blog I found it on here.  I hope you guys give this a try it was really easy to do and creates a really cute project at the end. I would love to see any projects that you create if you could upload them to the Two Scrapbook Friends layout gallery.